How to build large indoor positioning systems
A basic indoor positioning system, covering up to 1,000 m² of open space, for example, using a Starter Set Super-MP, can be deployed in minutes. See the Unpacking video as an example.
Key points of the statement above:
- Basic system – for example, a starter set. See detailed step-by-step guidance in the Operating Manual
- Open space
However, suppose the indoor positioning system covers multiple rooms, a warehouse, several floors, or even several buildings. In that case, the complexity of the system and the amount of effort jump dramatically. The network planning and deployment may take days or weeks, depending on the complexity of the resulting indoor positioning network, the skills required, and other factors.
If you wish, we can do everything for you remotely:
- Full Network Planning
- Full Remote Network Deployment
Please, read more about the services here:
- Precise indoor positioning – planning phase – a basic questionnaire we share with potential customers before the project starts
- Precise indoor positioning – implementation phase – steps we do together with customers from the start till the full implementation
At the same time, if you want to understand better how to build such sizeable indoor positioning systems, what is to be done, and what to pay attention to, this article is for you.

Defining factors for large indoor positioning systems
When building an indoor positioning system, everything starts with and is driven by a couple of defining factors. The key ones are:
- Line of sight between beacons. This is the key requirement for any precise indoor positioning system, and we have been covering the subject extensively: Line of sight is a must for accurate indoor positioning systems
- Limited range of beacons. To track the mobile beacon must have a direct line of sight (hearing) to two or more stationary beacons within 30 meters for 2D and three or more for 3D – i.e., the maximum practical recommended distance between neighboring beacons for the majority of cases is 30 meters. Thus, even if you have a large open space, for example, a football stadium, or a drone flying 120m above the ground, you have to build more submaps or use special solutions like Horns to have tracking over the large territory
Thus, for example, if the indoor positioning system used neutrinos that could go through the materials (walls, ceilings, people, machines) without interaction, we could have built GPS 2.0. But that is not the case yet. Thus, we must consider the line of sight requirement and create maps consisting of submaps, similar to how cellular networks are composed of cells.
If beacons had a larger range – hundreds of meters or kilometers – for large open spaces, the complexity of the indoor positioning networks would drop significantly. However, in practice, the limitation 1) – line of sight – is much stronger and even with very long range – more than 30m, for example – the main limitation for the real cases is the line of sight because indoors there are not so many areas of such an open space where you could see a volume of open space of 30x30x30m or more, for example. There are always walls, shelves, columns, machines, cranes, or similar obstructing objects.
There are other affecting factors, of course, such as capacity requirements and ease of deployment, etc. They are essential, but still minor compared to the ones listed above. Therefore, we will focus on the most important ones only.
Stages in building a large indoor positioning system
Working with an indoor positioning system consists of two major stages:
- Building the map of stationary beacons – building the indoor positioning system, in essence
- Using the indoor positioning system
Basics and key elements of indoor positioning systems
1) First of all, and before going deeper into the subject, study the basics from the Placement Manual. There is even a slide about the multi-room indoor positioning system.
Since we will be discussing different architectures, familiarize yourself with the differences between IA, NIA, and MF NIA in the Architecture Comparison document.
Identify common mistakes and learn to avoid them.
2) Check the demo video to see how the multi-room tracking works in practice. The video covers a more complex scenario – multi-room plus multi-floor – showing tracking in 1D, 2D, vertical 2D, and 3D. This demo aims to demonstrate that different modes (1D, 2D, vertical 2D, or 3D) may be optimal for various use cases. However, the video also provides a visual representation of how the multi-room indoor positioning system operates.
3) Study the Operating Manual, its submaps feature in detail in the Operating Manual, and the submaps feature in it.
4) See the detailed video about the submaps, service, and handover zones.
5) Familiarize yourselves with the key terms:
Supermap (a roadmap item – not yet commercially available):
- A map of maps controlled by a Super-Super-Modem
- Supermap will support hundreds of maps and, as a result, tens of thousands of beacons
- Supermaps are designed for huge maps consisting of either multiple floors or multiple buildings, when a single modem is not enough,h either because of radio coverage or because of the sheer number of beacons
Map
- A combination of submaps, service zones, beacons, and substrate
- The full and more correct name for a map could be a “map of stationary beacons”
- Often, the terms “map” and “system” can be interchanged
- Maps today (Feb. 2022) can have up to 250 submaps and up to 250 beacons (stationary and mobile combined)
- A part of a map consisting of one (1D), two (2D or vertical 2D), three (3D without redundancy), or four (3D with redundancy) stationary beacons
- A submap cannot have more than four stationary beacons. It would be best if you built an additional submap
- Submaps always assume a service zone, but the service zone is not shown in the Dashboard unless it is defined manually
- The default maximum distance between the beacons is 30m; i.e., beyond this distance, the beacons don’t listen
- The maximum distance may be set manually in each submap. It defines the size of the submap
- The larger the submap, the lower the location update rate will be
Service zone
- An area of responsibility for a submap
- The service zone is a must for multi-room or large submaps, as otherwise, with the default 30-meter distance limit, the service zones of each submap may be too large. They may be overlapping too much in a typical multi-room environment. It will lead to too many opinions on where the mobile beacon (hedgehog) is. Since views are always slightly or vastly different, for example, in the case of non-line-of-sight for distant submaps, too many opinions could confuse the system. That could lead to inferior tracking performance. Therefore, defining service zones is a solution to have robust tracking in complex maps
- For example, if you have an 8Hz update rate and you track a person with a maximum speed of 1m/s, a 1m handover zone would be an excellent selection: up to 8 location updates between the submaps is perfect – not too many, not too small. However, for a fast-moving drone of 10m/s, that could be just too narrow, particularly if the location update rate is just 4Hz, for example, because you could expect 4/1/10=0.4 location updates, i.e., almost always handovers would be hard handovers, but not soft handovers, and tracking would be poor
Handover zone
- An overlapped area of two or more service zones
- The width of handover zones must be sufficient but not too large. Adequate means that the handover zone is large enough to accommodate 2-6 location updates from the old submap and 2-6 location updates from the new submap as well. If the requirement is met, the handover will be soft-tracking in this area, which will be from two neighboring submaps
Mobile beacon = “hedgehog” or “hedge” or hedge
Stationary beacons – “owls” in IA
Submaps, service zones, handover zones - basics
Building larger maps consisting of multiple submaps - intro
Building larger maps consisting of multiple submaps - practical examples
Example: multi-room indoor positioning system
We have been contacted by one of our customers, and we will be using his materials as an example for this and similar cases. With his permission, I have included the Dashboard captures below. Since this help to the customer is a work in progress, let’s first check the current status of the track and see the advice below:
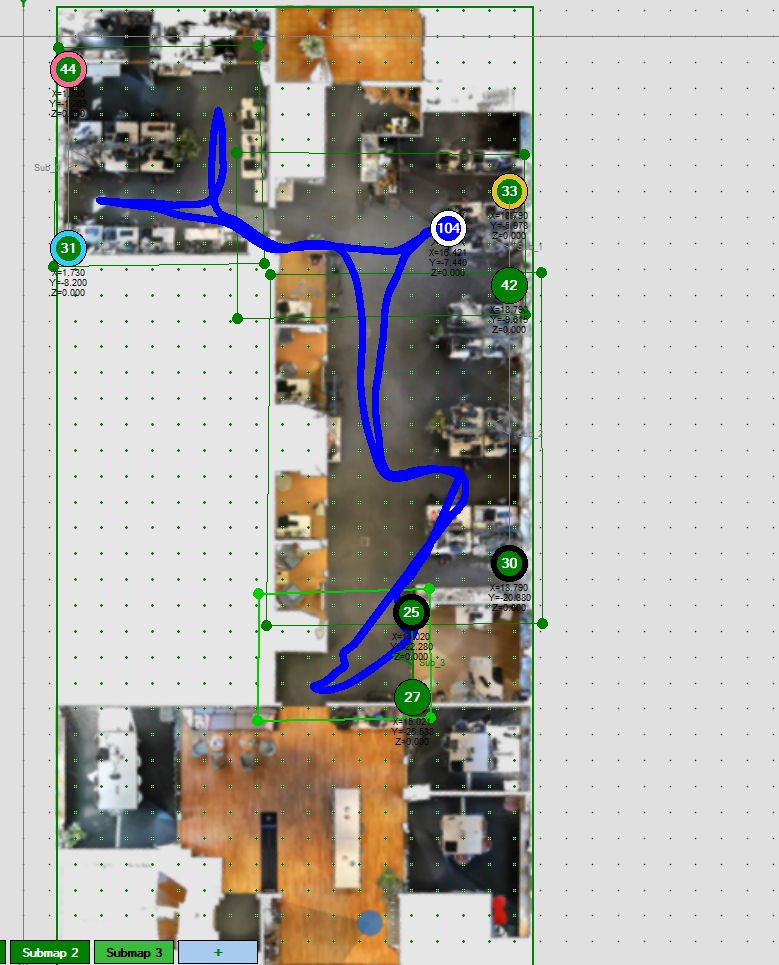
1) First of all, always build the maps in the following manner:
- For example, you plan to have four submaps, like in the scenario above. Build each submap standalone. Standalone – literally
- Achieve perfect tracking in each submap, so that other submaps do not exist. Just switch them off
- With optional licenses, you may keep the submaps active but switch them into mode: “not use for tracking”
- Optional features are not required for small maps – starter set plus a few beacons, for example. But they greatly simplify building larger maps and very much advised
- But you can do nearly the same by sending beacons of other submaps to sleep while working with your current submap.
- Always work only one submap at a time, first, and only then move to another submap
- Achieve perfect tracking in every map separately. And only then move to the next stage.
- It helps to clearly distinguish map-level, submap-level, and beacon-level problems (either stationary beacon problems or mobile beacon problems)
- When you already have a complete map of beacons active, and tracking is not perfect, it is almost impossible to say why it is so. It could be anything: forgotten heights of stationary or mobile beacons, not defined service zones, wrong SW versions, wrong settings in beacons or modem, non-line of sight in some areas, ultrasound noise, radio noise – and dozens of other reasons. If you built the map and started tracking in the hope of having everything working right away, almost certainly, you would have to disassemble everything to debug where the mistake was. Much easier and much faster is to build large indoor positioning systems bottom-up and have a controlled performance at each stage. Then, building such large systems becomes very easy indeed.
2) As soon as you have each submap working perfectly, and showing good tracking, define the service zone for each of them. It is possible to build the service zones earlier – in the first step, but, often, there is not yet a clear picture of all submaps, and building service zones for them is not convenient.
In any case, each submap’s service zones are a must for large indoor positioning systems or large maps, as described above. Without defining the service zones, the system may easily become confused with too many opinions about the location of mobile beacons coming from different submaps, and the system won’t know whom to trust. Service zones manually help the system with that.
Build the handover zones properly. The example above is good with that, as far as we can see. Service zones are defined, and the handover zones are good.
3) Switch off the Realtime Player when you build the map of beacons. The Realtime Player makes tracking visually smooth and eliminates small jumps or omissions, but it works well when the track is already smooth and good enough. In the beginning, it is better to use the raw location data and to see the problematic area clearly – before they are smoothed out with the Player.
How to align submaps in maps
The recommended and easiest way to align submaps into a map is to do the following:
- Install two mobile beacons (hedges) on a tripod of the same height and have a base between them of 0.5-1m
- Check the tracking of both hedges in each submaps you want to track. The track from both hedges must be perfect before you move to the next step
- Make sure you have service zones for each submap defined, and the handover zone has the right size. Confirm with tracking
- Enable the M1/M2 switch on the Dashboard map view. The switch activates a special mode: it measures the location of a beacon in one location update within a single submap, then calculates the location in another location update within a different submap. When you have submaps aligned, both locations are the same. When they are not, the locations jump with the location update rate
- By manually moving the submaps, you can align them so that there are no jumps between location updates. The submaps are aligned
It is possible to do the same just with one mobile beacon, but it takes more time because, with one mobile beacon, you can perfectly align at one point, but the submaps may not align with the angle. Thus, you must move to another point in the handover zone and check there. If jumping, the submaps are not aligned yet. The procedure must be repeated. However, while aligning the second point, it is easy to shift the first one; that is, it is an iterative process. Using two hedges at once makes it much more manageable.
It is possible to do the same without M1/M2 at all. However, it requires the hedge to move continuously between the submaps, entering the handover zone and leaving it. The submaps must be moved so that there will be no jumps between the submaps when the hedge moves into the handover zone and out.
Typical mistakes
The most basic and common mistakes
The common mistakes are very basic and they cover 95% of difficulties that users have with the system. They are easy to avoid, but they are still happening.
See video about typical mistakes and how avoid them.
The other 5% are very broad and wide, and the list below should be considered rather as a list of examples – to provide the range and potential ideas where the mistake can be found and fixed – than as clear guidance for correcting the mistake.
Incorrectly placing stationary beacons
Placing 3 or 4 stationary beacons in a line won’t create a 3D submap. It will be a 2D submap, because there is no surface and there is no volume in the area defined by the beacons. It is a line close to the line. It will be a 2D submap. However, by placing 3 or 4 stationary beacons in the submap, you instruct the system to use 3D mode. Tracking will be bad in this case.
Follow the Placement Manual and place the stationary beacons properly.
Practically important hints to remember and follow
We assume you have checked the materials above, including, Operating Manual and Typical mistakes with Precise Indoor “GPS”.
- Remember that the direct line of sight is the most important requirement. If basics like software versions and default settings are done correctly, having non-line-of-sight is the most common source of mistakes. Please, see more: Line of sight is a must for precise indoor positioning systems
- Move to the next stage only when you have perfect results on the previous stage. For large maps, it is vital because it is very difficult to distinguish between different types of problems. Bad tracking may originate from numerous sources. Only the step-by-step building of the system provides hope for clearly identifying the source of the problem. Hoping to jump to the end right away is nearly certain to result in unsatisfactory tracking results