Home » Step-by-step approach and its importance to success
Step-by-step approach
And its importance to the success with Marvelmind indoor positioning system
Step-by-step approach is the key to success
We have addressed the importance of the step-by-step approach in dealing with Marvelmind indoor positioning system for autonomous robots or drones multiple times in one way or another in our articles and videos and wrote countless emails begging customers to follow the approach and succeed with our system and virtually any other advanced system because the approach is universal:
However, many of our customers are over-enthusiastic and attempt to jump directly to the final configuration in a plug-and-pray approach 🙂
It doesn’t work for advanced multi-layer systems, unfortunately. The step-by-step approach is the fastest and the most confident way to succeed.
Why is "plug-and-pray" approach bad for complex system?
If you play in a casino and bet on black or red, the betting approach is good because you have 50% chances to succeed. But that is a single-step game or a single-layer system.
More advanced system are usually multi-step or multi-layers. Blind guessing without a verification will result in too low chances of success:
- Imagine that you have a system consisting in many layers, for example, 10-20 layers or steps
- In each layer, you have 10-80% of success – limited understanding of the system or other basic mistakes
- Each step is very simple to make and simple to verify and fix, if there is an issue on the step
- If you decide to build the whole system without verifying on each step, your expected success rate at the end would be between 0.8^10 to 0.1^20, i.e. between 10.7% to 1e-20 depending on your experience and the number of steps in the system.
Is it the success rate you aim at?…
The plug-and-pray approach – an attempt to build the whole multi-layer system, turn it on, and hope to see it working without the preliminary verification on each underlying layers – won’t return you results with acceptable probability of success, will eat your time, and may lead you to a failure with a relatively easy but a multi-layer system.
Step-by-step approach = confidence
The whole article is trivial and banal. However, we have seen so many times when well-educated users try to jump to final configuration and hope to have the system working that we cannot stress again on the importance of the step-by-step approach and try persuade users the take the basic step-by-step approach seriously and increase their success rate with our or any other multi-layer systems drastically.
There is no magic in the approach. But there are few key points that shall be clearly realized:
- Each atomic step in the system is simple despite the whole system may look very complex. Typically, each step can be explained even to a grandma or elementary school student and they would understand it
- Each step is fast and easy to verify, Testing on each layer is the key. You can always return to the saved configuration and retest it again and get the same result. After that you can even more carefully do the next step and see where exactly you make the mistake. It is also very critical to understand that testing and debugging on each step is very easy and very fast because you do small changes and, if there are mistakes, they as silly as: “oh! I didn’t switch on the beacon”, “oh! I didn’t enter the height of the beacon. My map or my readings are distorted”, “oh! The new beacon is behind the wall, and there is a non-line of sight at this point” – as simple as that. It is very easy to spot and fix right away. Very fast also. Why fast? – well, imagine an over-simplified scenario: you have 6 steps; on each step you have 10 ways to make a mistake, you don’t makes the decisions randomly, but still ten options exist; in order to make the system working you will have to make only six tests and proceed to the next step only after succeeding on the previous only; if you attempt to build everything and then start testing, you will have 10^6=1,000,000 testing variants vs. only 6 original tests with the step-by-step approch
- The debugging becomes a breath. You don’t need to search to billions of combinations. You know very exactly the issue is… “this step the results are OK. The next one – NOK. I do something wrong on exactly this step… – what exactly do I change?… – let me inspect the setup. Let me verify the results. Let me double-check the basics” and so forth. Instead of days of fruitless searches and guesses – minutes or even seconds. Isn’t it basic? Isn’t it obvious to do? – yes, it is … – but why aren’t so many very well-educated users don’t do that?… – the minds are always fascinating 🙂
- You are confident on each step because each underlying layer is verified. You base is not shaky because unproven assumptions. You are mentally focused and confident. It speeds up the development and debugging many times
- Increase the complexity one step at a time. It is the essence of the step-by-step approach. If you changed two or more things from the previous layer/step and something doesn’t work, it may be because of the change A or may be because of the change B or because of the change C. There is an explosion of combinations and options. Verification of all of them takes time … a lot of time … why to risk?! Change A and verify. Then apply the change B and verify. Apply the change C and verify. You will have three steps and only three verifications. With several changes at once, you may have thousands of combinations and it is difficult to confidently rule out many of them but it would be virtually impossible to verify all of them …
Examples to understand the importance of the step-by-step approach better
The logic with the step-by-step approach is very straightforward and very simple. You can skip the examples below because they simply explain everything that is already written above but stress it again in the context of the Marvelmind indoor positioning system.
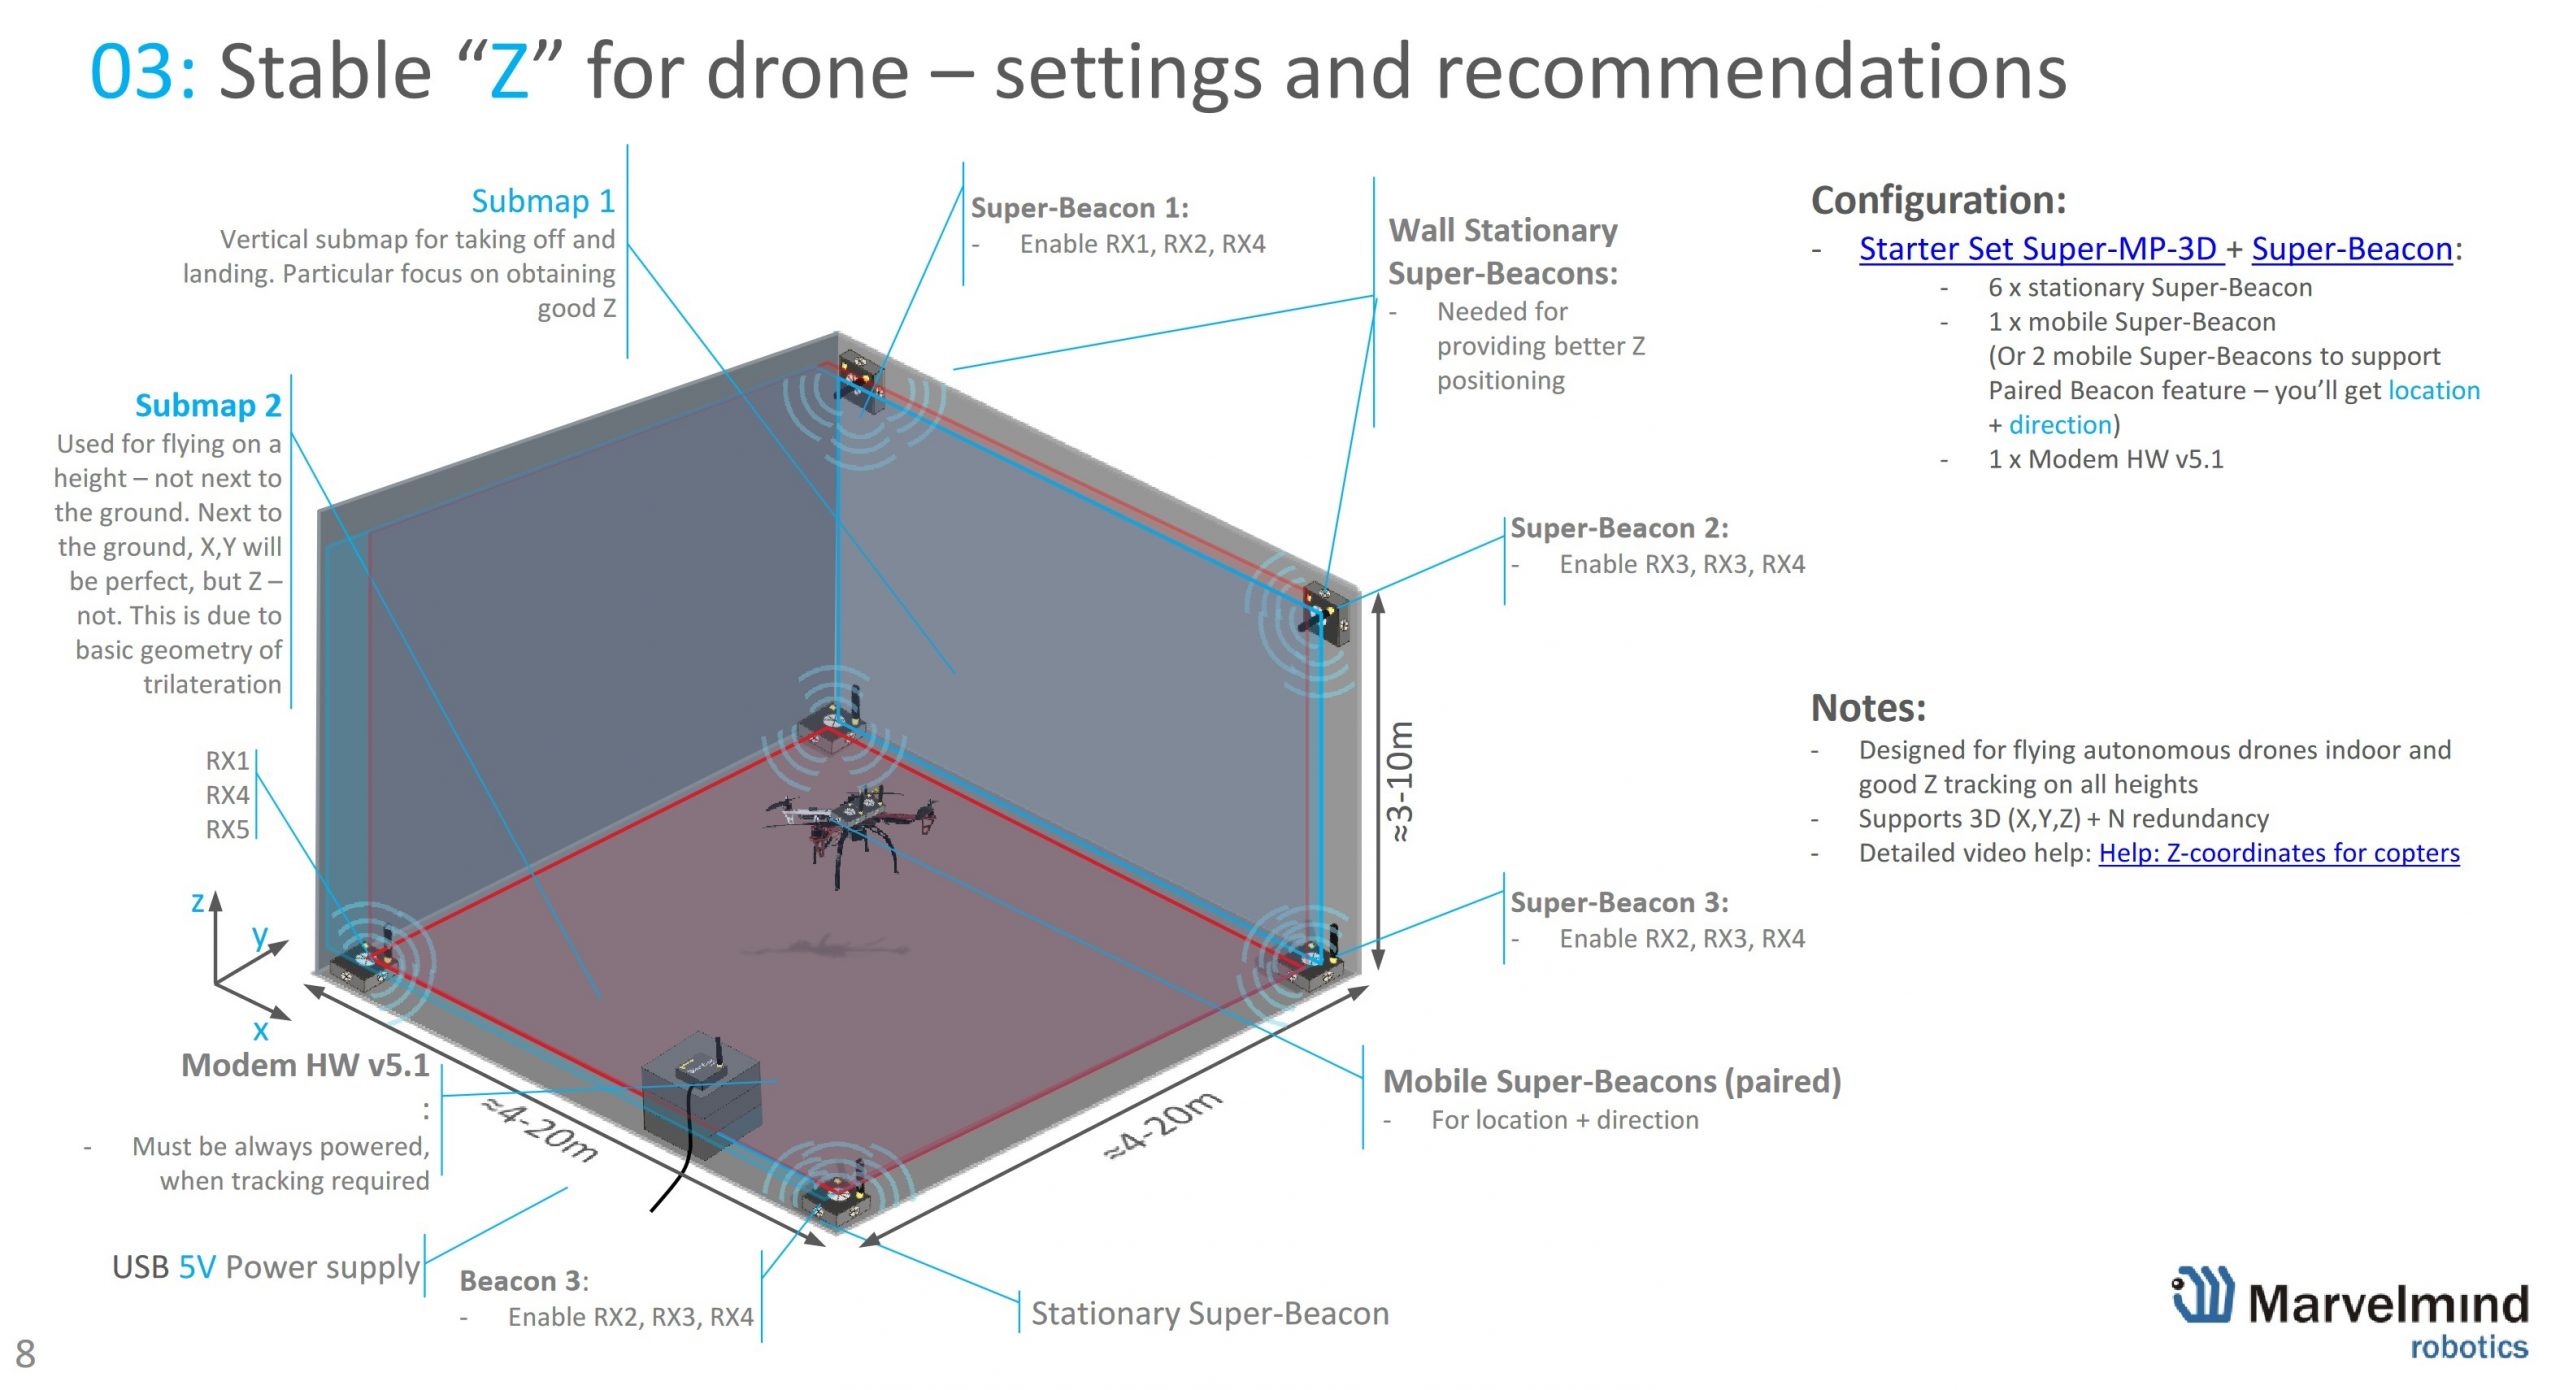
Precise Z configuration for autonomous drone
A typical request from a customer: “I am working on setting up the Marvelmind system for indoor drone flying. I am following the following scheme and “9.15.1. How to build vertical submap for stable Z” in the manual…
But I found out that on my dashboard there is only RX1 to RX4, no RX5. My beacon is Super-Beacon-3 with IMU. I followed that manual but the 4 ground beacon will not have any readings if only RX4 is turned on.
Does my model has 5 RX sensors or just 4?
If it only has 4, which orientation does each number map to?”
The answer to this question is very simple and it is not yet related to the sensors or transducers. It is about not advising to jumping to the final configuration right away. Of course, you will reach it but in small and verified steps. Otherwise, taking into account unfamiliarity with a multi-layer system like ours, there are too high chances of making somewhere a basic mistake and not knowing where exactly. There will be no clear guidance on how to find the mistake rather then go step-by-step and verify on each step that everything is still fine.
For example:
Step 1: build a basic 2D map consisting of a single submap in NIA:
- One mobile beacon on a tripod
- No drone yet.
- No flight yet.
- Of course, no autonomous flight yet
It doesn’t matter that you need 3D tracking, Precise Z and IA. You will get it but in small verified steps.
Build the 2D NIA with a single mobile beacon. Confirm the tracking. Save the configuration so that you can always return to it if the next layer/step doesn’t work for whatever reason.
Now, you have your first confidently working configuration. You are already beyond 50%+ of typical mistakes. You will be able to focus and easily and quickly find the mistake, if you do one small change from a layer to layer at a time.
As soon as you get your basic 2D tracking with a single beacon in a single submap, you have a tree of options for the next step. But the key is to make a single change at a time, for example:
- From one mobile beacon to two mobile beacons
- From NIA to IA
- From one submap to two submaps
- From 2D to 3D
The preferred next step depends on your skills, project, etc. The key point is very simple: only a single change in the configuration at a time – not more. This secures easiness and speed in debugging.
Step 2: For example, you chose to build 3D tracking with four stationary beacons instead of already working 2D tracking with only two stationary beacons. I repeat: NIA is still NIA, only one mobile beacon, only one submap, everything is still on the tripod and so on. Everything is the same. Nothing changed except for shift from 2D to 3D. Nothing else. Even with this basic change, you still have plenty of areas for mistakes:
- Not updated SW on new beacons
- Not defaulted settings on new beacons
- Non-line of sight for new beacons
- Unknown addresses for the new beacons
- Switched off new beacons
- Not set the heights for the new beacons
- Etc.
There is a room for many elementary mistakes but, at least, you will know very well where to search for them if the tracking is not perfect. You already have your proven 2D tracking – your already working 2D configuration. In the very worst case, you can disassemble the nonworking 3D configuration, return back to the working 2D configuration, and proceed from there from scratch with even more attention to what you do.
Verification of tracking (or success in other terms for other systems) is an absolute must at each step/layer.
After you succeeded with 3D, you again have a tree of choices:
- To move to IA
- To track two mobile beacons
- To install a beacon on the drone and try to fly the drone in the manual mode and see whether everything still works: the drones radio control or telemetry doesn’t interfere with Marvelmind radio, drone’s elements don’t create a non-line of sight for ultrasound, propellers don’t interfere with tracking, and so on
Step 3: For example, you decide to try IA because you are not sure about it. You read that IA is more complex than NIA. Well, for you IA as simple as NIA but IA is internally far more complex than NIA. And IA requires more attention from you. For example:
- For NIA, you can choose Super-Beacons with any frequency as mobile and stationary. It will work
- However, for IA, you don’t have that freedom. In IA, all stationary beacons in one submap must have different ultrasound frequencies
- It is preferred to have the frequencies with as large span between them as feasible because it makes filtering easier and more confident, for example, 25+31+37+45 kHz beacons are better than 19+22+25+28 kHz – note the frequency difference between the beacons
- If you plan to fly drones in IA, you may also want to check that 19-kHz or 22-kHz Super-Beacon may be not the best option since it is close to the audible spectrum and there could be too much acoustic noise coming from the propellers. May come or may not – it is easy and fast to verify using the Oscilloscope embedded into the Dashboard. Just test it and see it in seconds for your particular setup
The point shall be clear: each step is simple but each step is a new chance for a mistake. You can assign a weighed probability for the success. The probability depends on the accuracy of the users and their experience and complexity of the task, but the probability is always below one. Thus, when you have many steps, the chances to succeed in multi-layer system like Marvelmind indoor positioning system without a verification on each step goes to zero.
The only reliable, easy, and fast solution is to verify on each small step.
Step 4: after you succeeded with IA, you may try to test tracking on the drone in a manually controlled flight mode. Remember, until now, everything was on the tripod. See a similar example with show robots. Test with a single mobile beacon only. Let’s say – the left mobile beacon in the Paired Beacon configuration.
Step 5: after you succeeded with a left mobile beacon, switch it off, install the right beacon and repeat the previous step or even a few previous steps if you want to be particularly accurate and confident, but now with the right mobile beacon on the drone only.
Step 6: now, enable both mobile beacons at the same time but don’t pair them yet.
Step 7: pair the beacons. Remember about the left-right in the settings, check the cable between the mobile beacons to make the connection fast, make sure you know who is a master and who is a slave. Set the distance between the mobile beacons in the Dashboard right. Remember between what points exactly you measure the distance.
As you can see, on each steps there are basic traps you can fall into. Your task is to come through the simple puzzle with the least time, confirm the layer/step, and move to the next one. Simple? – simple. But the confirmation on each layer is a must since it is a puzzle and even the most accurate and knowledgeable of us can make mistakes. Don’t become lost. Verify each step before moving to the new one.
Step 8: it is time to integrate with your external system, for example, ArduPilot/PX4/PixHawk.
External systems are layered as well. Thus, use the same approach there. Verify each step from basic baudrate settings, to switching off magnetometers or barometers, to dozens of other settings. Don’t approach plug-and-pray. You may succeed with our system but fail with an external system. We don’t like that. We want you to succeed in your project end-to-end.
Step 9: succeeded with the autonomous flight? – congratulations! You are already better than 50% of users.
Remember that you wanted the Precise Z configuration. You already have basic 3D tracking and even basic autonomous flight. For example, your stationary beacons are 5 meters above the floor and you are flying under the beacons successfully. Everything according to the Placement Manual. Perfect!
However, you wanted the Precise Z configuration, for example, for autonomous landing or to combine the GPS-guided flight outside and then landing in a hangar:
Since you currently have a good autonomous flight but the mobile beacons are above your flight, now you need to place them on the floor facing up, and the mobile beacon must be now facing down. Do that.
You may even step back and instead of the autonomous flight confirm basic tracking of the mobile beacons either one by one first or immediately in the paired beacons configurations. It is up to you. The logic with the step-by-step configuration holds. The risks of jumping over steps even the small ones are still there.
One change at a time as usual. Don’t change anything else.
You may have issues with the Z coordinate near the plane of of stationary beacons, i.e. the floor. That is normal. See the video below. The problem with Z is the whole point to solve it later with the help of the Precise Z configuration. But we are not there yet.
Make sure that the autonomous flight is still good when you fly relatively far from the plane of stationary beacons and your geometry is good. More about the subject:
Step 10: since now you can fly well above the stationary beacons on the ground, it is time to build the second submap – the vertical one – the second part of the Precise Z configuration. As you can guess, the recommendation follows the same logic:
- Disable all other stationary (horizontal submap) beacons – beacons that don’t belong to the vertical submap
- Achieve perfect tracking first and then autonomous flight in the vertical submap only
Step 11: only at this stage, enable both submaps, set it properly in the Dashboard, verify basic tracking in both submaps and then attempt the flight:
After successful verification, your Precise Z setup is completed. Congratulations!
Answering other original questions from the email about transducers and microphones:
- Previously, we had analog Beacons HW v4.9. Their transducers were both transmitting and receiving
- In Super-Beacons, there are 5 transmitting transducers – TX1-TX5 – and one receiving microphone – RX1
- It is recommended that the beacon be pointed to the center of the served area with TX4 and RX1-microphone. Ideally, use something like: https://marvelmind.com/
product/magnetic-holder/ - Remember that each transmitting transducer has about a 90-degree diagram. See more in the Operating Manual
As you can see, the questions about the transducers may be relevant to building the Precise Z configuration but there is much more than that.
Summary
- The step-by-step approach is a very straightforward and the fastest way to confidently succeed with complex system including Marvelmind indoor positioning system
- The plug-and-pray approach may be faster in theory but it doesn’t work in practice in reality at all with multi-layer systems because the approach returns negligibly low probability of success when there are many layers in the system or many steps are required